

Do you update your WordPress site and still see the old version in your browser? Chances are the cache is in the way. In this article you will read what exactly cache does, why you sometimes need to empty it and how to do it step by step.
What is cache and why do you need to empty it?
Cache is a smart way to make your website faster. Files such as images, scripts or complete pages are temporarily stored so that visitors do not have to reload everything every time. The result: a smooth website that is pleasant for your visitors.
But that same cache can also get in the way. If you make a change: a new design, changed text or a plugin update, sometimes you still see the old version. Your browser or WordPress then shows the saved copy instead of the current page. This can lead to confusion: you don't see what you just changed, visitors get to see outdated content, or error messages appear even though the site is technically already correct.
By regularly clearing the cache, you force your website and browser to load the latest files. This ensures that you are always viewing the current version of your site and prevents unnecessary frustration.
How do you empty your WordPress site's cache?
Emptying your cache may sound technical, but often it's a matter of a few clicks. Depending on where the cache is stored - your browser, a plugin, the server or a CDN - use a different method. Here's a step-by-step guide on how to go about it.
Step 1: Start with your browser cache
Your browser itself stores temporary files. Delete these first to make sure you're not looking at an old version. In Chrome, Firefox, Safari or Edge, you can do this using the hotkey Ctrl + Shift + Delete (Windows) or Cmd + Shift + Delete (Mac). Choose "Cached images and files" and click on Clear.
Step 2: Empty the WordPress cache via your plugin
Many WordPress sites use a caching plugin that automatically saves copies of pages. Each plugin has its own way of emptying the cache, usually via a button in the top bar or in the plugin menu.
The best-known plugins in a row:
- WP Rocket: premium plugin with extensive optimizations. Clear cache via Settings → WP Rocket → Clear Cache.
- W3 Total Cache: powerful free plugin with many settings. Clear cache via Performance → Dashboard → Empty All Caches.
- WP Super Cache: simple free plugin, especially suitable for beginners. Clear cache via Settings → WP Super Cache → Delete Cache.
- WP Fastest Cache: user-friendly plugin with options to empty cache, CSS and JS. Button Delete Cache can be found in the toolbar or plugin menu.
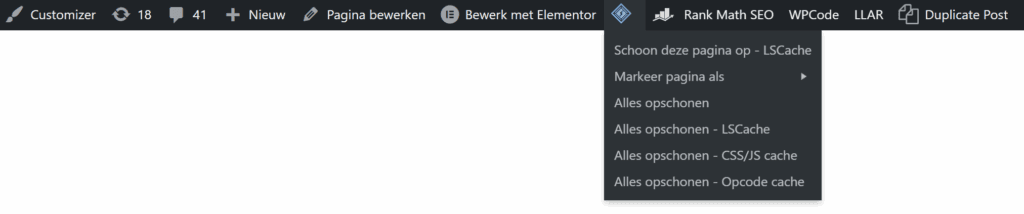
- LiteSpeed Cache: Our favorite and standard if you have your WordPress website host at Surver. Ideal if you are hosting LiteSpeed servers. Clear cache via the menu LiteSpeed Cache → Manage.
In short: If you use hosting with Surver, then LiteSpeed Cache is the logical choice. This plugin works seamlessly with our servers and combines speed with ease. If you're looking for simplicity beyond LiteSpeed, then WP Super Cache or WP Fastest Cache are good options. If you want more control and additional features like minification, then WP Rocket or W3 Total Cache are more powerful.
Step 3: Check the server cache at your hosting
Some hosting parties add caching themselves at the server level. This speeds up your site, but can also prevent changes from being immediately visible. You can empty this cache in your hosting panel or via an additional button in your WordPress dashboard.
Step 4: Don't forget your CDN cache
Are you using a CDN such as Cloudflare? Then your website will be distributed and stored worldwide. Log in to your CDN dashboard and select Purge Everything or remove specific URLs to make sure the latest version is shown everywhere.
When do you use which method?
Emptying the cache is not always done in the same place. Which method you choose depends on the situation:
- Empty plugin cache: useful after a change in your content, design or when updating a plugin. This way you can immediately see if everything has been implemented properly.
- Empty browser cache: use this especially if you are testing yourself and notice that you are still seeing old files. It can also help if you're working with a designer or developer and you don't see each other's changes right away.
- Empty server cache: relevant when making changes at the hosting level, or when working with managed hosting that applies server caching by default.
- Empty CDN cache: necessary if you use a Content Delivery Network such as Cloudflare. This ensures that the latest version of your site is immediately available anywhere in the world.
How often should you empty your cache?
Clearing the cache is part of good site management. You don't have to do it every day, but you do have to do it when you have made changes or are experiencing problems. Always start with your browser cache, then empty the cache via your plugin and then check the server or CDN cache if necessary.
Doing this in the right order ensures that you are always looking at the most recent version of your site. This avoids frustration with updates, helps detect bugs faster and keeps your site stable and fast for visitors.